Bing SafeSearch is a feature that allows you to filter out adult content from your search results.
However, sometimes you may find that you cannot change the SafeSearch setting on Bing using the Edge browser on your desktop.
You may see a message that says “Your country or region requires a strict Bing SafeSearch setting, which filters out results that might return adult content.”
This message is incorrect, as you live in a country or region that does not have such a requirement. In this article, we will explain what causes this issue and how you can solve it.
Read: Bing Homepage Quiz Not Giving Points? (Fixed)
How to Fix Bing SafeSearch Stuck On Strict?
#1: Change SafeSearch Settings on Bing
The first and simplest method is to change the SafeSearch settings on Bing itself. To do this, follow these steps:
1. Open your browser and go to Bing.com.
2. Make sure you are signed in with your Microsoft account.
3. Click on the action button (top-right corner) and click on Settings.
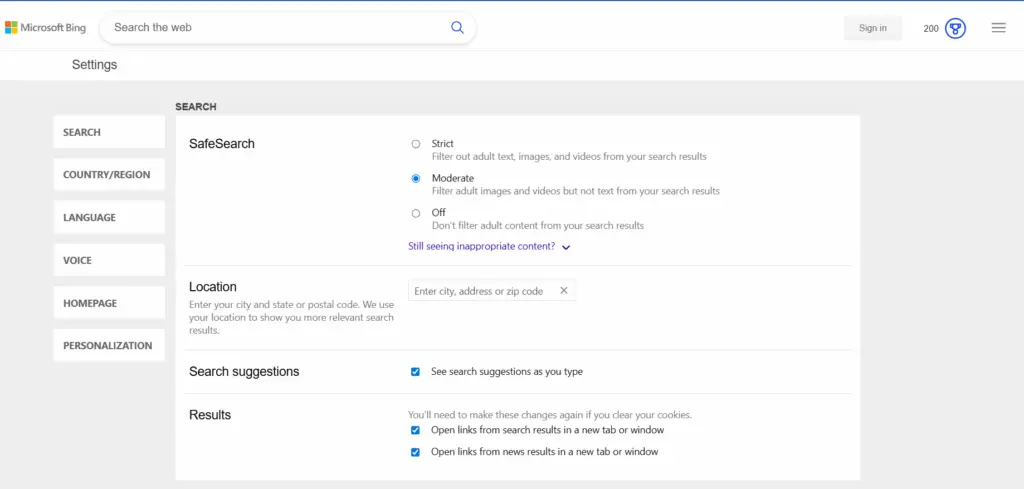
4. In the Settings menu of Bing, go to the Search section and set SafeSearch to Off
5. Hit the Save button at the bottom of the menu and see if SafeSearch is now disabled when using Bing.
#2: Update Your Location on Bing
Sometimes, Bing SafeSearch is stuck on Strict mode because of your location.
Some countries or regions require a strict Bing SafeSearch setting, which filters out results that might return adult content. To check if this is the case, follow these steps:
1. Open your browser and go to Bing.com.
2. Click on the action button (top-right corner) and click on Settings.
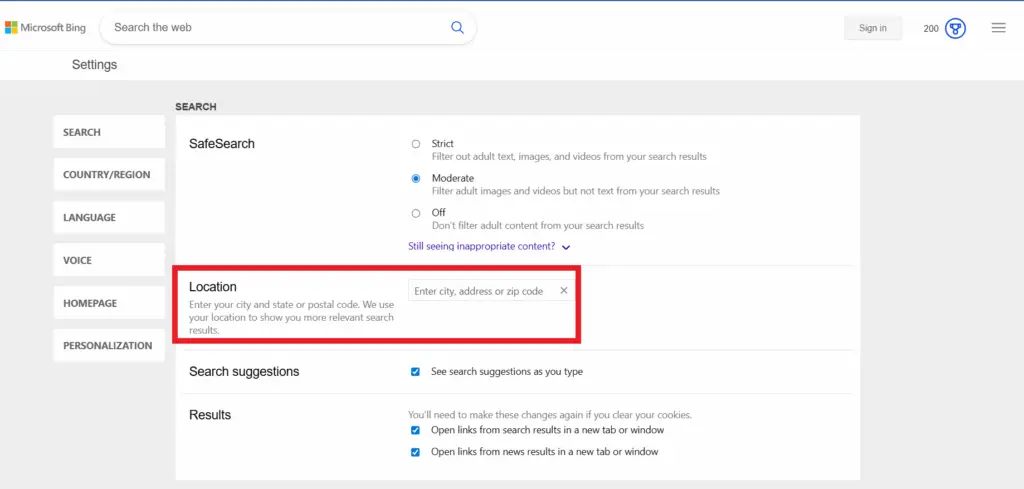
3. In the Settings menu of Bing, go to the Country/Region section and select your correct location from the drop-down menu.
4. Hit the Save button at the bottom of the menu and see if SafeSearch is now disabled when using Bing.
#3: Clear Your Browser Cache and Cookies
Another possible reason why Bing SafeSearch is stuck on Strict mode is because of your browser cache and cookies.
These are temporary files that store information about your browsing history and preferences. Sometimes, they can get corrupted or outdated and cause problems with your browser settings.
To clear your browser cache and cookies, follow these steps:
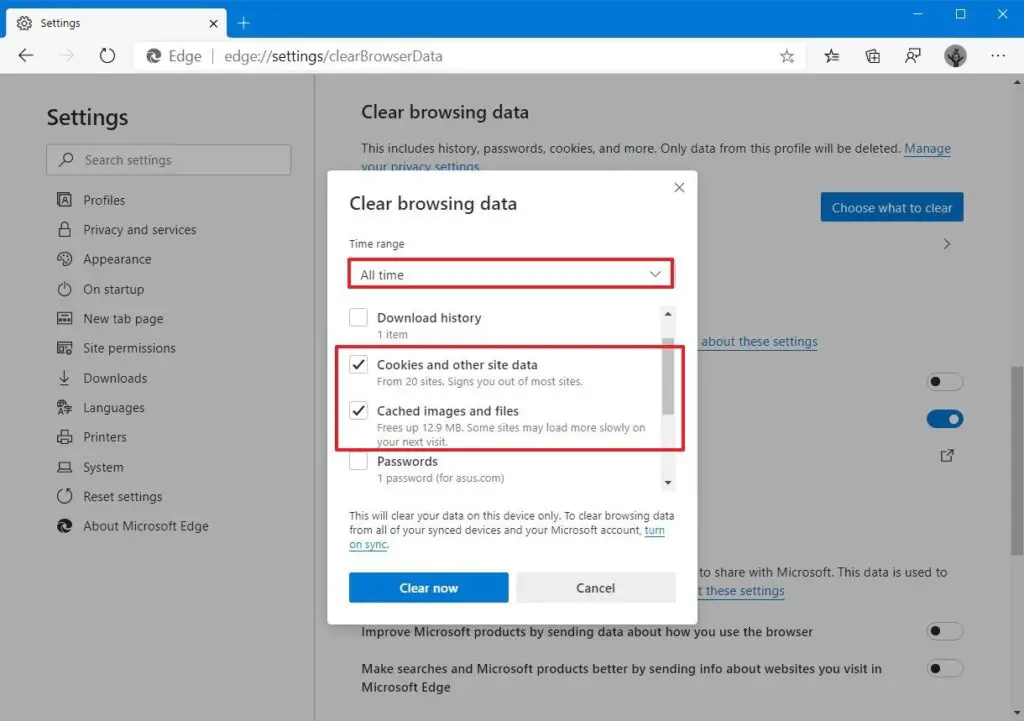
1. Open your browser and go to the Settings or Options menu.
2. Find the option to clear your browsing data, cache, or history. This may vary depending on your browser.
3. Select the time range that you want to clear, such as the last hour, the last day, or all time.
4. Make sure to check the boxes for cache and cookies, and any other data that you want to clear.
5. Click on the Clear button and wait for the process to finish.
6. Restart your browser and see if SafeSearch is now disabled when using Bing.
#4: Use a Different Browser or Device
If the previous methods did not work, you can try using a different browser or device to access Bing.
This can help you determine if the problem is with your browser, your device, or your network. To do this, follow these steps:
1. Download and install a different browser on your device, such as Chrome, Firefox, or Safari.
2. Open the new browser and go to Bing.com.
3. Try to change the SafeSearch settings on Bing and see if it works.
4. If it works, then the problem is with your original browser. You can try to update, reinstall, or reset your browser to fix the issue.
5. If it does not work, then the problem is not with your browser. You can try to use a different device, such as a laptop, a tablet, or a smartphone, and see if it works.
6. If it works, then the problem is with your original device. You can try to update, scan, or troubleshoot your device to fix the issue.
7. If it does not work, then the problem is with your network. You can try to use a different network, such as Wi-Fi, mobile data, or a VPN, and see if it works.
#5: Check Your Windows User Account
Another possible reason why Bing SafeSearch is stuck in Strict mode is because of your Windows user account.
If you are using a Windows 10 Education or Enterprise edition, you may have some restrictions on your user account that prevent you from changing the SafeSearch settings on Bing. To check if this is the case, follow these steps:
1. Open the Start menu and click on the Settings icon.
2. In the Settings app, go to the Accounts section and click on Your info.
3. Check your account type and see if it is an Administrator or a Standard user.
4. If it is a Standard user, you may need to ask an Administrator to change the SafeSearch settings on Bing for you.
5. If it is an Administrator, you may need to check the Group Policy settings that apply to your user account.
#6: Check Your Group Policy Settings
Group Policy is a feature that allows administrators to manage the settings and permissions of users and computers on a network.
If you are using a Windows 10 Education or Enterprise edition, you may have some Group Policy settings that enforce a strict Bing SafeSearch setting for your user account.
To check if this is the case, follow these steps:
1. Press the Windows key + R to open the Run dialog box.
2. Type gpedit.msc and click OK to open the Local Group Policy Editor.
3. In the left pane, navigate to the following path: Computer Configuration > Administrative Templates > Windows Components > Search.
4. In the right pane, double-click on the policy named Set the SafeSearch setting for Windows Search.
5. Check the policy state and see if it is Enabled or Disabled.
6. If it is Enabled, you can see the SafeSearch setting that is applied to your user account. It could be Strict, Moderate, or Off.
7. If you want to change the SafeSearch setting, you can select the Not Configured or Disabled option and click OK.
8. Restart your computer and see if SafeSearch is now disabled when using Bing.
#7: Use a Registry Editor
If none of the above methods worked, you can try to use a Registry Editor to change the SafeSearch setting for Bing.
However, this method is not recommended for beginners, as it involves modifying the system registry, which can cause serious problems if done incorrectly.
Therefore, you should only use this method as a last resort, and make sure to back up your registry before proceeding. To use a Registry Editor, follow these steps:
- Press the Windows key + R to open the Run dialog box.
- Type regedit and click OK to open the Registry Editor.
- In the left pane, navigate to the following path: HKEY_CURRENT_USER\Software\Microsoft\Windows\CurrentVersion\Search
- In the right pane, right-click on a space and select New > DWORD (32-bit) Value.
- Name the new value BingSearchEnabled and set its value data to 1.
- Right-click on the new value and select Modify.
- In the Value data box, type 1 and click OK.
- Restart your computer and see if SafeSearch is now disabled when using Bing.
Why Bing SafeSearch is Stuck On Strict?
#1. Windows 10 Education Usergroup Policy
One possible cause of this issue is that you are using a Windows 10 Education version that has a user group policy that enforces a strict SafeSearch setting on Bing.
This policy may have been set by the school or organization that provided the Windows 10 Education key.
You may not have permission to change this policy or access the group policy editor.
In this case, the only solution is to switch to a different version of Windows 10 that does not have this policy, such as Windows 10 Home or Pro.
#2. Browser Preference or Extension
Another possible cause of this issue is that your browser has communicated a preference for a strict SafeSearch setting to Bing.
This may happen if you have enabled parental control or a content filter extension on your browser.
To check if this is the case, you can try using a different browser or device and see if you can change the SafeSearch setting on Bing.
If you can, then the issue is related to your browser settings.
To fix this, you can disable or uninstall any parental control or content filter extension on your browser, or reset your browser settings to default.
#3. Location Detection Error
A third possible cause of this issue is that your location is not correctly detected by Bing. Some features and functionality of Bing may vary depending on the country or region of the user.
For example, some countries or regions may require a strict SafeSearch setting by law or regulation.
If Bing thinks that you are in such a country or region, it may lock the SafeSearch setting too strictly and prevent you from changing it.
To check if this is the case, you can look at the Country/Region under settings in Bing and see if it matches your actual location.
If it does not, you can update your location in your Bing account or use a VPN to switch to a different country or region.
Conclusion
Bing SafeSearch is a useful feature that helps you avoid unwanted or inappropriate content in your search results.
However, sometimes it may get stuck on strict and prevent you from changing it. This issue may have different causes and solutions depending on your situation.
By following the steps above, you may be able to fix this issue and enjoy a more personalized and flexible search experience on Bing.

")